Balloon arches are more than just decorations; they're statements. They transform ordinary spaces into celebratory realms, adding a touch of whimsy, elegance, and pure joy. Whether you're planning a birthday bash, a wedding reception, a corporate event, or just looking to add some flair to your next gathering, a well-crafted balloon arch can be the focal point that captivates your guests and sets the perfect tone.
But creating a truly "wow-worthy" balloon arch takes more than just blowing up a bunch of balloons. It requires careful planning, the right tools and techniques, and a dash of creativity. This comprehensive guide will walk you through every step of the process, from initial concept to final flourish, empowering you to create a stunning balloon arch that will leave a lasting impression.
Planning and Preparation: Laying the Foundation for Success
Before you even think about inflating a single balloon, careful planning is crucial. This initial stage will save you time, money, and potential frustration down the line.
Define Your Vision:
Purpose: What is the occasion? A child's birthday party calls for bright, playful colors, while a wedding might demand a more sophisticated and romantic palette.
Style: What overall aesthetic are you aiming for? Consider different arch styles:
Classic Arch: A symmetrical, semi-circular shape - the traditional choice.
Organic Arch: An asymmetrical, free-flowing design that mimics natural forms.
Square Arch: A modern and geometric option, perfect for contemporary events.
Double Arch: Adds depth and dimension by layering two or more arches.
Location: Where will the arch be placed? Consider the space available, the background, and any potential obstructions. Will it be indoors or outdoors? This impacts balloon choice (weather resistance) and anchoring methods.
Color Palette: Choose a color scheme that complements the event and the surrounding decor. Stick to 2-4 colors for a cohesive look. Consider using color theory to create visually appealing combinations. Monochromatic schemes (different shades of the same color) are elegant and sophisticated, while complementary color schemes (colors opposite each other on the color wheel) are bold and eye-catching.
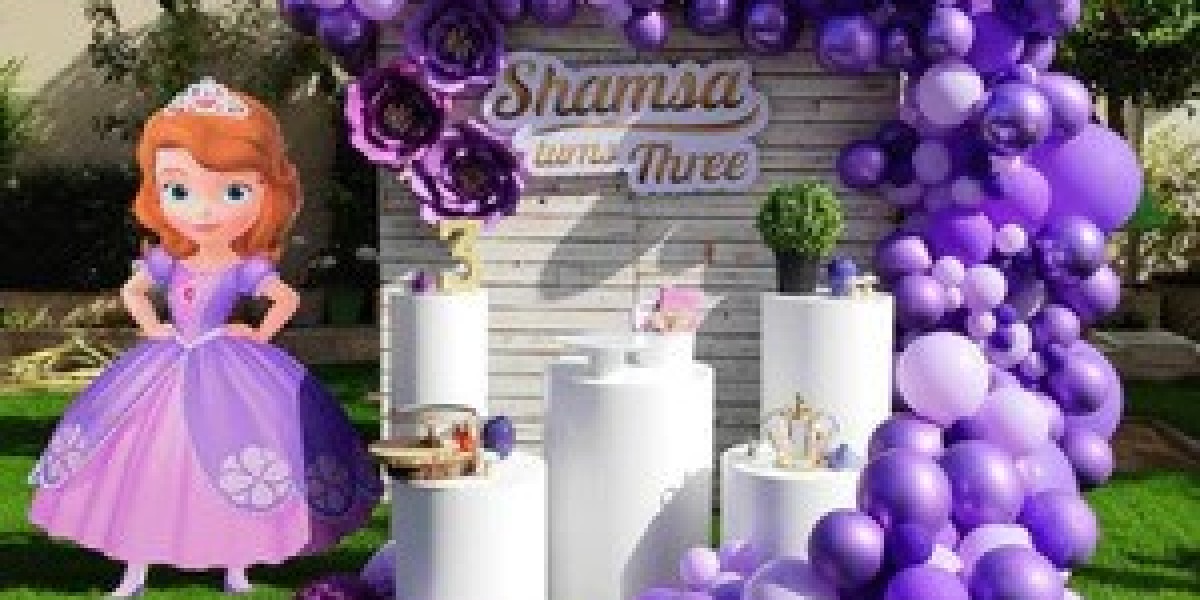
Theme: If your event has a specific theme (e.g., "Under the Sea," "Hollywood Glamor"), incorporate it into the arch's design.
Gather Your Supplies:
Balloons: This is the most important element!
Size: 5-inch, 9-inch, 11-inch, and 12-inch balloons are the most common sizes for arches. Using a mix of sizes adds visual interest.
Type: Latex balloons are biodegradable and readily available. Foil balloons can add shine and are often used for accents. "Double-stuffed" latex balloons (one balloon inside another) create unique colors and improved durability.
Quantity: This depends on the size and style of your arch. A general rule of thumb is to estimate at least 10 balloons per foot for a standard arch, but factor in extra for pops and mistakes. Use online calculators for a more precise estimate.
Balloon Inflator: A must-have for saving time and energy. Electric balloon pumps are the most efficient, but hand pumps are a good alternative for smaller projects.
Balloon Sizer Box or Template: Ensures consistent balloon sizes, creating a uniform and polished look.
Fishing Line, Balloon Tape, or Frame: Choose the method for connecting your balloons (explained in detail below).
Scissors or Craft Knife: For cutting fishing line or balloon tape.
Anchors: Sandbags, water weights, or sturdy stands to secure the arch in place.
Optional Decorations: Floral accents, ribbons, streamers, glitter, or thematic elements to enhance the arch's design.
Ladder or Step Stool: For reaching higher sections of the arch (especially important for larger installations).
Balloon Glue Dots (Optional): For attaching smaller balloons to fill in gaps and add texture.
Assess Your Space:
Measurements: Accurately measure the area where the arch will be placed. This will determine the length and height of your arch.
Surface: Consider the surface where the arch will be anchored. Is it smooth and flat? Will you need to protect the floor?
Environmental Factors: Wind, sunlight, and temperature can affect the lifespan of your balloons. Outdoor arches require more robust anchoring and may need to be constructed closer to the event time to minimize deflation or damage.
Choosing Your Construction Method: Fishing Line, Balloon Tape, or Frame?
The method you choose for assembling your balloon arch will affect its stability, shape, and overall appearance. Here's a breakdown of the most common options:
Fishing Line (Balloon Garland Technique):
Pros: Most cost-effective, allows for organic shapes and free-form designs, relatively easy to learn.
Cons: Can be time-consuming, requires careful knotting and spacing, less structured than other methods.
How To:
Inflate balloons to consistent sizes using a sizer.
Tie two balloons together at their knots.
Twist these pairs together to create a quad (cluster of four balloons).
Thread fishing line through the knots of the quads, leaving a tail of line at the beginning for anchoring.
Push the quads close together on the fishing line for a dense garland.
Add balloon glue dots to fill in any gaps.
Attach the ends of the garland to your anchors.
Balloon Tape (Balloon Decorating Strip):
Pros: Faster than fishing line, creates a more uniform look, easy to adjust and reposition balloons.
Cons: Can be more expensive than fishing line, less flexible for creating organic shapes, requires specific balloon tape.
How To:
Inflate balloons to consistent sizes.
Pull the knots of the balloons through the holes in the balloon tape.
Alternate colors and sizes for visual interest.
Once the tape is full, attach the ends to your anchors.
Use balloon glue dots to fill in any gaps.
Frame (PVC Pipe or Metal Arch):
Pros: Most sturdy and professional-looking, allows for precise shape and control, reusable.
Cons: Most expensive option, requires more setup and disassembly, less flexible for organic designs.
How To:
Assemble your PVC pipe or metal arch frame.
Inflate balloons and tie them into clusters (usually quads).
Attach the balloon clusters to the frame using zip ties or balloon tying tools.
Overlap the clusters to hide the frame and create a dense, even look.
Secure the frame to your anchors.
The Art of Inflation: Consistency and Patience are Key
Inflating hundreds of balloons can seem daunting, but with the right tools and techniques, it can be a manageable process:
Use a Balloon Inflator: This will save you a significant amount of time and effort.
Consistent Sizing: Use a balloon sizer box or template to ensure all your balloons are the same size. This is crucial for a uniform and professional look. Under-inflated balloons create gaps and an uneven appearance. Over-inflated balloons are more likely to pop.
Avoid Over-Inflation: Over-inflated balloons are more prone to popping, especially in warm weather. Inflate balloons until they are firm but still slightly pliable.
Proper Knotting: Tie secure knots at the base of each balloon to prevent air leakage. Double-knotting is recommended for extra security.
Sort by Color and Size: Organize your inflated balloons by color and size to streamline the assembly process.
Assembling Your Masterpiece: Step-by-Step Instructions
Once you've chosen your construction method and inflated your balloons, it's time to bring your vision to life:
Start with the Base (for fishing line and balloon tape methods): Begin building your garland or tape strip, alternating colors and sizes as planned.
Attach to Anchors: Securely attach one end of your garland or tape strip to one of your anchors.
Shape the Arch: Gradually shape the arch as you attach the remaining balloons. You may need to adjust the spacing and tightness of the balloons to achieve the desired curve.
Secure the Other End: Attach the other end of the garland or tape strip to the second anchor, ensuring the arch is stable and balanced.
Fill in Gaps: Use balloon glue dots to attach smaller balloons to fill in any gaps and create a fuller, more polished look.
Add Accents (Optional): Enhance your arch with floral accents, ribbons, streamers, glitter, or other thematic elements. Secure these decorations with balloon glue dots or floral wire.
Anchoring for Stability: Keeping Your Arch Grounded
Proper anchoring is essential for preventing your arch from toppling over, especially outdoors.
Sandbags: Fill sturdy bags with sand or gravel for a heavy and reliable anchor.
Water Weights: Use containers filled with water as an alternative to sandbags.
Stands: Purchase or build sturdy stands specifically designed for holding balloon arches.
Secure to Existing Structures: If possible, attach the arch to existing structures such as walls, posts, or trees using rope, zip ties, or clamps.
Consider the Environment: In windy conditions, use heavier anchors and reinforce the arch with additional supports.
Troubleshooting: Addressing Common Problems
Even with careful planning, you may encounter some challenges during the balloon arch construction process:
Balloons Popping: Avoid over-inflation and protect the balloons from sharp objects and extreme temperatures.
Gaps in the Arch: Use balloon glue dots to attach smaller balloons to fill in any gaps.
Unstable Arch: Reinforce the anchors and add additional supports if needed.
Uneven Shape: Adjust the spacing and tightness of the balloons to achieve the desired curve.
Garland/Tape Breaking: Use strong fishing line or high-quality balloon tape. Reinforce weak points with additional knots or tape.
Tips for Success: The Devil is in the Details
Practice Makes Perfect: Before tackling a large arch, practice your chosen construction method with a smaller garland or section.
Recruit Help: Enlist the help of friends or family members to speed up the inflation and assembly process.
Work in a Well-Lit Area: Good lighting will help you see details and identify any gaps or imperfections.
Take Breaks: Building a balloon arch can be tiring. Take regular breaks to avoid fatigue and maintain focus.
Be Creative: Don't be afraid to experiment with different colors, sizes, and styles to create a unique and personalized arch.
Have Fun! Enjoy the process of creating something beautiful and memorable for your event.
Beyond the Basics: Elevating Your Balloon Arch
Once you've mastered the fundamentals, you can explore more advanced techniques to create truly spectacular balloon arches:
Ombre Effect: Create a gradient effect by gradually changing the color of the balloons along the arch.
Adding Texture: Incorporate different textures by using balloons with varying finishes (e.g., metallic, pearl, matte).
Focal Points: Create visual interest by adding larger balloons, foil balloons, or other decorative elements at strategic points along the arch.
Custom Color Blends: Double-stuff balloons to create unique and custom colors.
Organic Balloon Walls: Create a backdrop using a similar technique as organic arches, but on a larger scale.
By following these guidelines and letting your creativity shine, you can confidently create a balloon arch that will not only wow your guests but also transform your event into a truly unforgettable experience. Remember to plan ahead, gather your supplies, practice your techniques, and most importantly, have fun! The possibilities are endless, and the results are guaranteed to be spectacular.