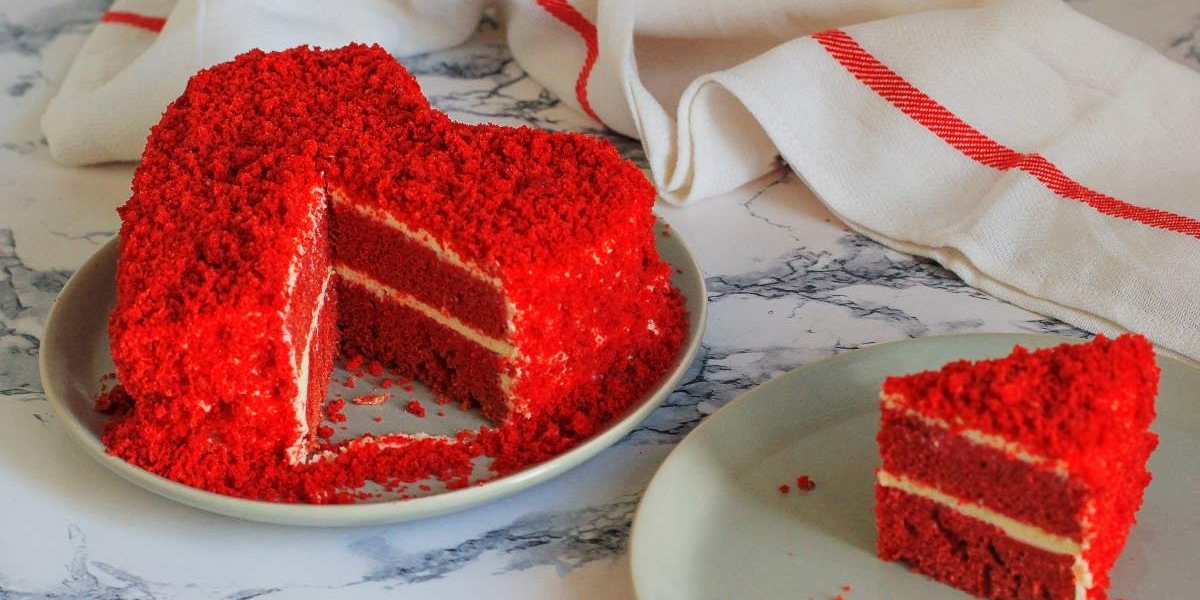

A tall, crimson-crumbed cake with a swoop of white frosting has a way of making any table feel like a celebration. Red velvet is popular for good reason: it is gentle on the palate, striking on the plate, and surprisingly forgiving once you know the basics. Still, home bakers often get stuck on the practical details. How do you turn a recipe into a sheet cake, cupcakes, or a layered centerpiece? Which frosting holds up best at a party? How far ahead can you bake without losing freshness?
This guide takes a practical, occasion-first approach. You will learn why the cake is red, how to pick the right format, how to make a one-bowl version in a single pan, how to frost and decorate with confidence, and how to plan the whole bake around your event. Whether you are baking a Classic Red Velvet Cake for an anniversary or a Homemade Red Velvet Cake for a weekend potluck, you will find a plan that fits.
Why Is Red Velvet Cake Red?
The color is the first thing people notice and the first thing they ask about. The answer has changed over time, which makes it a fun piece of baking history.
The Chemistry Behind the Original Color
In earlier recipes, natural cocoa mixed with acidic ingredients such as buttermilk and vinegar produced a faint reddish-brown tint. Anthocyanins in cocoa react to acid by shifting toward red tones. The effect was subtle, more mahogany than ruby, and it depended heavily on the cocoa used.
Why Modern Recipes Use Food Coloring
As cocoa processing changed, the natural tint faded. Bakers began adding red coloring to keep the cake looking the way people remembered it. Today, nearly every recipe relies on coloring for a vivid result. Gel coloring is the most efficient choice because a small amount delivers deep color without thinning the batter or adding a bitter edge.
Natural Color Alternatives
If you prefer to skip synthetic dyes, you have options:
Beet powder: Gives a deep rose-to-maroon shade and very little flavor when used in modest amounts.
Pomegranate or cranberry powder: Adds a warm red tint with a slight fruity tang.
Cooked beet puree: Adds moisture along with color, so reduce the buttermilk by a couple of tablespoons.
Expect a softer, earthier shade than the bright red of gel coloring. Both versions taste wonderful.
Choosing Your Style: Layer, Sheet, Cupcake, or Naked
The same batter adapts to many shapes. Pick the one that matches your event and your confidence level.
Two-Layer Round Cake
The traditional showpiece. It looks impressive and slices neatly, but it asks for a little more time on cooling, leveling, and frosting. Best for birthdays and holidays.
9x13-Inch Sheet Cake
The stress-free choice. There is no stacking or leveling, and you can frost it right in the pan, which also makes it easy to carry. This is the format used in the recipe below.
Cupcakes
Ideal for parties, classrooms, and bake sales. The recipe below makes about 20 cupcakes when baked in lined muffin tins for 18 to 22 minutes.
Naked or Semi-Naked Cake
Thin frosting between layers and a light scrape on the outside lets the red crumb show through. It is a lovely look for rustic weddings and spring brunches.
Ingredients for the One-Bowl Sheet Cake
This version uses a mix of oil and sour cream to deliver a tender, rich crumb with minimal cleanup. Set your eggs, sour cream, and buttermilk on the counter for about 30 minutes before you begin.
For the Cake (one 9x13-inch pan)
2¼ cups (280 g) all-purpose flour
1½ cups (300 g) granulated sugar
1 tablespoon (about 8 g) unsweetened cocoa powder
1 teaspoon baking soda
½ teaspoon baking powder
1 teaspoon fine salt
¾ cup (180 ml) neutral oil
¾ cup (180 ml) buttermilk, room temperature
½ cup (120 g) full-fat sour cream, room temperature
2 large eggs, room temperature
1 tablespoon red gel food coloring
2 teaspoons pure vanilla extract
1 teaspoon white vinegar
For the Cream Cheese Frosting
12 oz (340 g) full-fat block cream cheese, softened but still cool
¾ cup (170 g) unsalted butter, softened
4 cups (480 g) icing sugar, sifted
1½ teaspoons pure vanilla extract
Pinch of fine salt
Helpful Substitutions
Buttermilk: Combine 1 tablespoon lemon juice with enough milk to reach ¾ cup and let it rest for 5 minutes.
Sour cream: Plain full-fat yogurt works in a pinch.
Gel coloring: Use 2 tablespoons of liquid coloring if gel is unavailable, and reduce the buttermilk by 1 tablespoon to compensate.
Step-by-Step Method
This Easy Red Velvet Cake Recipe takes about 20 minutes of hands-on time, plus baking and cooling. It serves 15 to 20 people, depending on how you slice it.
Step 1: Prepare the Pan
Preheat the oven to 350°F (175°C). Grease a 9x13-inch pan, line the bottom with parchment, and lightly grease the parchment. This makes it easy to lift the cake out if you want clean edges.
Step 2: Whisk the Dry Ingredients
In a large bowl, whisk the flour, sugar, cocoa, baking soda, baking powder, and salt. Break up any cocoa lumps with the back of a spoon.
Step 3: Add the Wet Ingredients
Make a well in the center. Add the oil, buttermilk, sour cream, eggs, coloring, vanilla, and vinegar. Whisk from the center outward until the batter is smooth and evenly red, about 1 minute. Scrape the bottom and sides of the bowl so no white streaks hide.
Step 4: Bake
Pour the batter into the pan and smooth the top. Tap the pan on the counter twice to release air bubbles. Bake for 30 to 35 minutes, or until a toothpick inserted in the center comes out with a few moist crumbs. Avoid opening the oven door in the first 25 minutes.
Step 5: Cool Completely
Cool the cake in the pan on a wire rack for at least 1 hour 30 minutes. Frosting a warm cake causes it to melt and slide. If you are short on time, cool for 30 minutes on the counter and then chill for 30 minutes in the refrigerator.
Step 6: Whip the Frosting
Beat the butter for 2 minutes until pale. Add the cream cheese and mix just until smooth, about 30 seconds. Gradually add the icing sugar on low speed, then the vanilla and salt. Beat on medium for 1 minute. If the frosting looks loose, chill it for 15 to 20 minutes.
Step 7: Frost and Slice
Spread the frosting generously from edge to edge. For tidy slices, chill the frosted cake for 30 minutes and wipe your knife between cuts.
The Frosting Guide: Choosing What Holds Up Best
Frosting is half the experience, and the right choice depends on your weather, your schedule, and your taste.
Classic Cream Cheese Frosting
Tangy, creamy, and a perfect match for the mild cocoa. It needs refrigeration and softens quickly in a warm room. Use block cream cheese and keep it cool for the best structure.
Ermine (Cooked Flour) Frosting
Made by cooking flour and milk into a thick paste, cooling it, and whipping it into butter. It is silky, less sweet, and sturdier in warm weather than many whipped options.
Stabilized Whipped Cream
Light and cloud-like. Whip cold heavy cream with icing sugar and a spoonful of mascarpone or a little gelatin so it holds its shape. If you enjoy this style of cream-and-fruit pairing, the same idea appears in this ultimate Black Forest cake, where whipped cream and cherries balance rich chocolate.
Quick Frosting Troubleshooting
Too soft: Chill for 20 minutes, then re-whip briefly.
Too stiff: Beat in one teaspoon of milk at a time.
Grainy: Sift the icing sugar next time, and make sure the butter is not too cold.
Too sweet: Add a pinch more salt and a squeeze of lemon juice.
Decorating Ideas for Every Skill Level
You do not need professional tools to make a showstopper. A few simple finishing touches go a long way.
The Crumb Topper
Trim a thin layer from the top of a baked cake, crumble it, and sprinkle the red crumbs over the frosting. It looks bakery-quality, costs nothing, and instantly signals what flavor is inside. This is the simplest way to make a Red Velvet Cake look polished.
Fresh Fruit
Raspberries, strawberries, and pomegranate seeds add color contrast and a pleasant tartness that cuts through the sweetness.
Chocolate Details
White chocolate curls, dark chocolate shards, or a light dusting of cocoa create texture and visual drama. Use a vegetable peeler on a room-temperature chocolate bar to make curls.
Nuts and Texture
Chopped toasted pecans or walnuts add crunch. Crushed pistachios bring a beautiful green accent, and if you love that nutty, elegant look, you will enjoy the flavor combination in this pistachio cake recipe.
Seasonal Themes
Valentine's Day: Heart-shaped cutters on a sheet cake and pink sprinkles.
Christmas: Rosemary sprigs and sugared cranberries.
Canada Day: Fresh strawberries and a maple leaf stencil dusted with icing sugar.
Spring brunch: Edible flowers and lemon zest.
Flavor Pairings and Mix-Ins
The base batter is a great canvas. Try small changes to make the cake your own.
Orange zest: Adds brightness that pairs beautifully with cream cheese.
Espresso powder: One teaspoon deepens the cocoa without making the cake taste like coffee.
White chocolate chips: Fold in half a cup for little pockets of sweetness.
Cinnamon or cardamom: A quarter teaspoon adds subtle warmth for autumn and winter baking.
Raspberry filling: Spread a thin layer of seedless jam between layers for a fruity surprise.
If you are building a dessert table and want more variety, consider pairing it with a banana-based bake. This chocolate chip banana cake offers a different flavor and texture next to the cream cheese frosting.
How to Keep the Cake Soft and Moist
Small habits protect the crumb. Weigh your flour, because scooping can pack in too much. Fold gently and stop mixing once the batter is uniform. Pull the cake from the oven as soon as the toothpick shows a few moist crumbs. The sour cream and oil in this version help produce a Moist Red Velvet Cake that stays tender even after a night in the refrigerator.
Party Planning: A Make-Ahead Timeline
Stress-free baking is about timing. Use this schedule as a template.
Two Days Before
Gather ingredients and bring the oven rack to the center position. Bake the cake, cool it completely, and wrap it tightly. Store at room temperature.
One Day Before
Make the frosting, cover it, and chill. Bring it to cool room temperature and re-whip briefly before using. Frost the cake and refrigerate.
Day Of
Remove the cake from the refrigerator 20 to 30 minutes before serving. Add fresh fruit or garnishes just before guests arrive so they stay vibrant.
Building a Full Dessert Table
Offer a variety of looks and flavors. Next to the crimson cake, a richer chocolate option such as this moist chocolate cake gives guests a bolder choice, and a swirled option like this marble cake adds a playful two-tone slice. Variety keeps everyone happy and makes the table look abundant.
Storage, Freezing, and Food Safety
Unfrosted cake: Wrap tightly and keep at room temperature for up to 2 days.
Frosted cake: Refrigerate in a covered container for up to 4 days.
Freezing the cake: Wrap the cooled cake or cupcakes in plastic wrap and foil, and freeze for up to 3 months. Thaw overnight in the refrigerator.
Freezing the frosting: Freeze in an airtight container for up to 2 months. Thaw in the refrigerator and re-whip before using.
Food safety: Cream cheese frosting should not sit at room temperature for more than 2 hours, or 1 hour in hot weather.
Troubleshooting Quick Reference
Dry crumb: Too much flour or overbaking. Weigh the flour and check early.
Dull color: Too little coloring or too much cocoa. Use gel coloring.
Sunken center: Oven door opened too soon or old baking soda. Test your baking soda with vinegar; it should fizz.
Dense texture: Overmixing. Whisk only until smooth.
Cracked top: Oven too hot. Use an oven thermometer to verify the temperature.
Why You Can Trust This Guide
Devine Dishes focuses on practical recipes for home cooks, with clear measurements, visual cues, and troubleshooting so you can bake with confidence. Ovens, flours, and coloring brands vary, so treat time ranges as guidelines and rely on the toothpick test and the appearance of the cake. If you or your guests have allergies, check the labels on cocoa powder, food coloring, and cream cheese, as ingredients differ between brands. Nutrition varies by slice size and ingredients, so use a nutrition calculator with your specific products if you need exact numbers.
Five Rules to Remember Before You Bake
If you remember nothing else, remember these. Every Best Red Velvet Cake Recipe relies on the same fundamentals: room-temperature ingredients, gentle mixing, accurate measuring, patient cooling, and chilled frosting. Follow those five habits and you will end up with a Soft Red Velvet Cake that slices cleanly and tastes balanced, tangy, and tender.
Final Thoughts
A Red Velvet Cake works for nearly any occasion because it is easy to adapt. Pick the format that suits your event, stick to the fundamentals, and finish with a frosting and decoration style that matches your mood. The one-bowl method keeps cleanup minimal, and the make-ahead timeline takes the pressure off the day of your celebration.
Your next step is simple: choose your pan, set out your ingredients tonight, and bake tomorrow. When you are done, snap a photo, share it with someone you love, and explore more cake ideas from Devine Dishes for your next gathering.
Frequently Asked Questions
Why is my cake brown instead of red?
Usually there is not enough coloring or there is too much cocoa. Use gel coloring and keep the cocoa to one tablespoon.
Can I use liquid food coloring instead of gel?
Yes, but you will need roughly twice as much, and it can add slight bitterness. Reduce the buttermilk by a tablespoon to balance the added liquid.
Is Red Velvet Cake supposed to taste like chocolate?
Only slightly. It has a mild cocoa note, but the dominant flavors are buttery vanilla and the tang of buttermilk, which is what sets it apart from a standard chocolate cake.
Can I make it without buttermilk?
Yes. Mix 1 tablespoon of lemon juice or white vinegar with enough milk to equal ¾ cup, then rest it for 5 minutes before using.
How do I get clean slices?
Chill the frosted cake for 30 minutes, use a long sharp knife, and wipe the blade clean with a warm damp cloth between cuts.
Can I bake it in advance for a party?
Absolutely. Bake up to two days ahead, wrap well, and frost the day before or the day of serving.