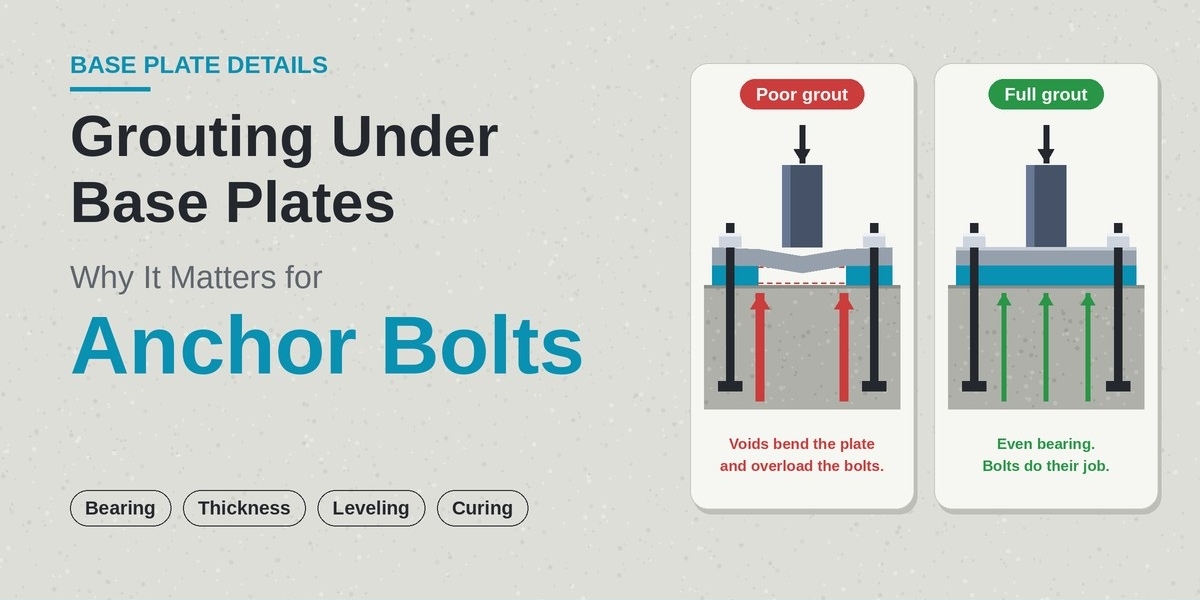

A steel column looks finished once it is bolted down, but the connection is not complete until the gap under the base plate is filled. That layer of grout is easy to treat as a cosmetic detail, yet it decides how load reaches the foundation and how much work the Anchor Bolts end up doing. This guide explains what grout does, how it affects the bolts, and how to place it so the connection performs the way it was designed.
What Grout Actually Does
Grout fills the space between the underside of the base plate and the top of the concrete. In service it has four jobs:
- Provides full bearing. It spreads compression from the column evenly into the foundation instead of letting the plate rest on a few high spots.
- Supports the plate so it cannot rock, flex, or deflect under load.
- Transfers force in the load path from steel to concrete.
- Protects the connection by keeping water, chemicals, and debris out of the gap.
Grout is a bearing material, not a tension material. Uplift must still be carried by the rods, which is why the bolts and the grout are designed together and not as separate details.
Why Grout Matters So Much for Anchor Bolts
Anchor Bolts are sized for tension and shear. They are not meant to carry the column’s compression, and they are not meant to bend. Poor grouting changes that quietly:
- Voids under the plate leave parts of it unsupported. Compression concentrates on the remaining contact, and the plate can bend and lever on the rods.
- Uneven bearing can push extra load into the bolts, especially under moment or uplift.
- A thick grout pad or leveling nuts create a stand-off. Under shear, the rod acts like a short cantilever, which adds bending. ACI 318 applies a reduction to shear capacity where a grout pad is present, so the design should reflect the real gap.
- Water entry through cracks or voids reaches the rod at the point where it leaves the concrete, which is the usual start of corrosion.
In short, good grout lets the bolts do the job they were sized for.
Choosing the Right Grout
The grout should match the loading, the environment, and the equipment. Common options are:
| Grout type | Best suited to | Points to watch |
|---|---|---|
| Non-shrink cementitious grout | Most structural columns and static equipment | Needs correct water content, curing, and temperature control |
| Epoxy grout | Vibrating or dynamic equipment, chemical exposure | Sensitive to temperature and mixing, and usually costs more |
| Dry-pack mortar | Small gaps and thin sections | Needs skilled placement and thorough compaction |
For cementitious products, look for grouts tested for volume stability, such as under ASTM C1107, and follow the manufacturer’s data sheet for strength, flow, and placement limits. Dynamic equipment foundations have their own guidance, such as ACI 351.3R, and epoxy grouts are common there. Always use the grout named in the specification, and treat any substitution as an engineering question.
Thickness and Plate Geometry
Gap size affects both grout performance and bolt behavior:
- Keep the gap as thin as the design allows. Thicker pads are weaker, more prone to cracking, and add stand-off to the rods.
- Allow enough room for the grout to flow. The data sheet normally gives minimum and maximum thickness for the product.
- Provide vent or relief holes in large plates, so air can escape and the grout can be seen reaching the far side.
- Chamfer or slope the exposed edges, commonly at about 45 degrees, to resist chipping and shed water away from the plate.
- Extend the grout slightly beyond the plate and form it neatly, so edges are protected.
Leveling Methods and Their Trade-Offs
The plate has to be held at the right elevation while grout cures. Common methods are:
- Leveling nuts on the anchor rods, which are fast and adjustable but add stand-off and put erection loads through the rods
- Steel shims or wedges, which can be left in place or removed once the grout has gained strength, as the specification directs
- Leveling plates or pre-grouted plates, used on large or sensitive installations
Whichever method is chosen, the design should state it, because it changes the bolt check in shear and the erection-stage loads. Until the grout has cured, the plate does not bear on it, so a partly built frame depends on the rods and the leveling devices.
Placing Grout Step by Step
A reliable procedure looks like this:
- Prepare the concrete. Roughen the surface, remove laitance, oil, and loose material, and clean thoroughly. Cementitious grouts usually want a saturated, surface-dry substrate, while epoxy needs a dry one, so follow the data sheet.
- Check the plate and bolts. Confirm elevation, plumb, and nut engagement, and make sure the underside of the plate is clean and free of rust or grease.
- Build forms. Use rigid, sealed formwork with a head box or funnel, and leave space for the grout to flow to all sides.
- Mix to the instructions. Use the specified water content and mixing time, and keep batches consistent. Adding extra water weakens the grout and invites bleeding and shrinkage.
- Place from one side. Pour continuously so the grout pushes air ahead of it, and watch it emerge at the opposite edge. Avoid placing from several sides, which traps air.
- Consolidate gently. Use rodding or strapping where the data sheet allows, and avoid vibrating that causes segregation.
- Finish and protect. Trim and chamfer the edges, then cure as the manufacturer directs, including temperature limits and protection from sun, wind, and rain.
- Wait before loading. Do not tighten final nuts or apply operating loads until the grout reaches the strength the specification requires.
Common Mistakes
- Grouting before the plate is aligned and the rods are checked
- Dirty or sealed concrete surfaces, which prevent bond
- Too much water in the mix
- Forms that leak or trap air
- Placing from multiple sides and leaving voids
- Using the wrong grout for vibrating equipment
- Ignoring temperature limits, for example in hot desert conditions or cold weather
- Leaving thick, unreinforced pads where a thinner layer was specified
- Loading the plate before the grout has cured
Inspecting and Repairing Grout
Tap the grout with a small hammer and listen for hollow areas, and look for cracks, crumbling, gaps at the plate edge, and rust stains. Small defects can often be repaired by removing damaged material and regrouting. Larger voids, cracking around anchors, or signs of plate movement should go to the engineer. Record the findings with photos and keep them with the project records.
Materials and Sourcing
Grouting protects the rods, but the rods still have to be the right ones. Specify rod, nut, and washer as a matched set, and ask for mill test certificates, grade markings, and coating reports, checking that heat numbers match the tags on delivery. Suppliers differ in what they make, test, and document, so compare them on certification and traceability as well as price. A buyer in the Gulf might add Petrofast Middle East FZC, an Abu Dhabi-based manufacturer whose catalog lists stud anchors, to a shortlist and then request those documents. Whoever you choose, reject any material that does not match its paperwork.
A Quick Checklist
- Grout type, thickness, and leveling method stated in the drawings
- Concrete surface prepared and clean
- Plate aligned, rods checked, nuts engaged
- Forms sealed, with a head box and room for flow
- Grout mixed and placed per the data sheet, from one side
- Edges chamfered, curing protected, loads delayed
- Grout inspected for voids and cracks later
Conclusion: Grout and Anchor Bolts Work Together
Grout is not filler. It supports the plate, spreads compression, blocks water, and lets Anchor Bolts do the tension and shear work they were sized for. A thin, well-placed, well-cured layer keeps the connection predictable, while a poor one adds bending, corrosion, and uneven loads to the rods. Plan the grout alongside the bolts, place it carefully, and inspect it over time. Final specifications always belong with the engineer of record and the governing code.